使用 Cypress 进行端对端测试
使用 Cypress 进行端对端测试
为什么写端对端测试
写端对端测试代码的最大好处就是,把相关的用例变成可执行的代码,成为项目的资产;结合CI系统,可在后续研发维护过程中,将一部分测试过程自动化,减少重复的手工劳动,既保障质量,又提高效率。
谁来写呢?本文的目标读者是前端研发人员,因而相关测试代码是由前端同学去编写的。
为什么用 Cypress
文档齐全,生态好,对 JavaScript 友好,可简单上手。更多详见:why-cypress
缺点:全英文档
快速开始
安装
yarn add cypress -D
下载完依赖后,cypress 还会再从网络下载二进制执行包。安装完成后会在本地全局缓存一份二进制执行包,那么这台机器上所有项目都可以使用这份缓存。文档参考
一般而言,国内用户都会在上述过程中卡住,最好在命令行设置网络代理后再下载(懂的自然懂)。
export https_proxy=http://127.0.0.1:7890 http_proxy=http://127.0.0.1:7890 all_proxy=socks5://127.0.0.1:7890
如果是在 CI 环境,记得缓存 cypress binary。
安装完后,修改 package.json
  "scripts": {
    "e2e": "cypress open"
  }
加速下载
因为安装时,需要科学上网,如果不想设置代理,也能加速下载安装。可以自己先下载官方提供的二进制 cypress.zip,再上传至自己的 OSS。
则安装 Cypress 时,设置 CYPRESS_INSTALL_BINARY 指向对应的地址即可。如
CYPRESS_INSTALL_BINARY=https://your-oss.com/6.1.0-linux-x64-cypress.zip yarn
或使用淘宝镜像,缺点是可能包不是最新的。
CYPRESS_INSTALL_BINARY=https://npm.taobao.org/mirrors/cypress/6.2.0/linux/cypress.zip
或这样写
CYPRESS_DOWNLOAD_MIRROR=https://npm.taobao.org yarn add cypress -D
目录结构
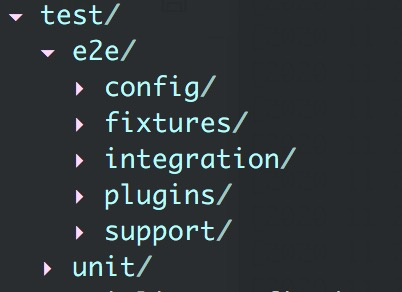
推荐结构如上图所示的目录结构:
- cypress 相关的内容放到 test/e2e 文件夹下。与单元测试的 unit 文件夹区分开来
- config 存放不同环境下的变量,如 dev/uat 环境的 baseUrl 是不同的,可分别在 config 里
- fixtures 存放测试 mock 数据
- integration 存放的就是 cypress 的测试用例了,命名规范同 jest:${name}.spec.js
- plugins 存放的是相关插件
- support 存放自定义的 cypress 命令
可以根据要求,修改文件夹目录结构,只要在 cypress.json 里配置好即可:
{
  "fixturesFolder": "test/e2e/fixtures",
  "integrationFolder": "test/e2e/integration",
  "pluginsFile": "test/e2e/plugins/index.js",
  "screenshotsFolder": "test/e2e/screenshots",
  "supportFile": "test/e2e/support/index.js",
  "videosFolder": "test/e2e/videos",
  "viewportWidth": 1280,
  "viewportHeight": 800
}
注意,如果不显示声明这些配置,每次执行 cypress 命令都会自动生成相应的示例文件
cypress.json 是放在项目根目录下的默认配置文件,全部配置项可查看文档
通过 FEMessage/create-nuxt-app 生成的项目默认是使用上面的配置
与 Jest 协同工作
当项目也在使用 jest 进行单元测试时,有两个注意点。
ESLint 配置
推荐项目中存在三份 eslint 配置文件:
// 项目根目录下的 .eslintrc.js
module.exports = {
  root: true,
  extends: [
    'plugin:prettier/recommended',
  ],
}

// test/unit/.eslintrc.js
module.exports = {
  extends: [
    'plugin:jest/recommended',
  ],
}

// test/e2e/.eslintrc.js
module.exports = {
  extends: [
    'plugin:cypress/recommended',
  ],
}
当然,还要安装相应的依赖:
yarn add eslint-plugin-jest eslint-plugin-cypress --dev
测试目录
两个工具都需要明确指定各自的测试目录。
cypress 的测试目录可通过上文所说的 cypress.json 指定。
jest 测试目录则可通过在 jest.config.js 里指定:
module.exports = {
  // 也可使用 testRegex 属性
  // 详见文档:https://jestjs.io/docs/en/configuration#testmatch-arraystring
  testMatch: ['<rootDir>/test/unit/?(*.)+(spec|test).[jt]s?(x)'],
}
检查依赖及生产安装依赖命令
请确保生产安装依赖命令为
yarn --frozen-lockfile --production
上述命令,只会安装 package.json 里声明的 dependencies 依赖,避免因为下载 Cypress 而超时。
因此,也要确保项目中 package.json 中的 dependencies devDependencies 等声明是正确的。
第一个用例
新建 common.spec.js
describe('', () => {
  it('联系客服按钮', () => {
    cy.visit('/')
    cy.get('.cy-customer-service').click()
    cy.get('[id*=_QIDIAN_WEB_IM_IFRAME_]').should('exist')
  })

  it('合作生态 加入我们 按钮', () => {
    cy.visit('/cooperation/si')
    cy.get('.cy-cooperation-btn').should('have.css', 'width', '98px')
  })
})
上面的示例覆盖了三个 cypress 常用命令:
- 跳转页面
- 获取元素
- 断言
这里说一下 should 命令,它相当于是 expect.to 的简写。
如: expect($input).to.be.disabled 可写成 get($input).should('be.disabled')
如果想获得代码提示、代码补全,需在开头添加如下语句,(Webstorm不需要此配置)参考文档
/// <reference types="Cypress" />
执行 yarn e2e ,出现弹窗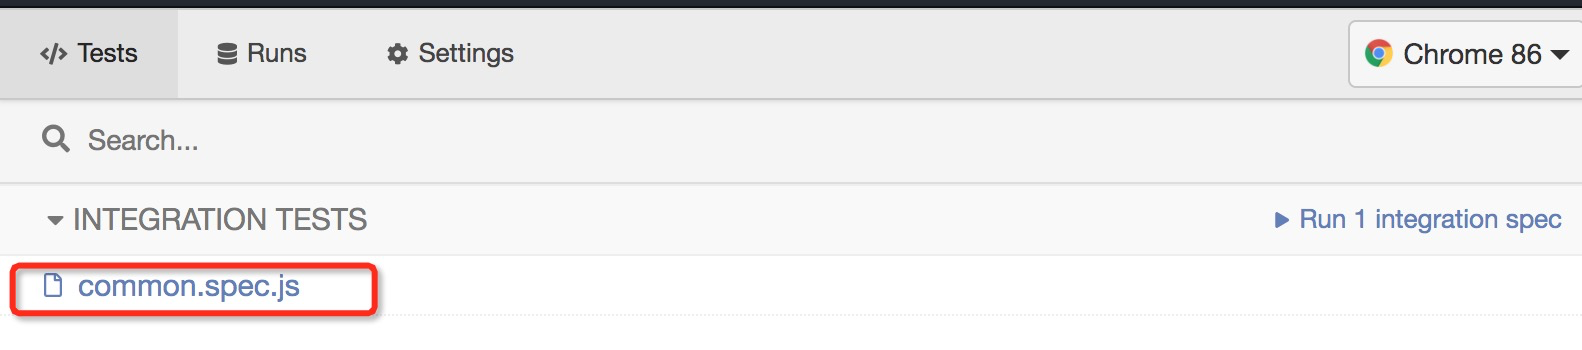
点击文件,即会执行用例。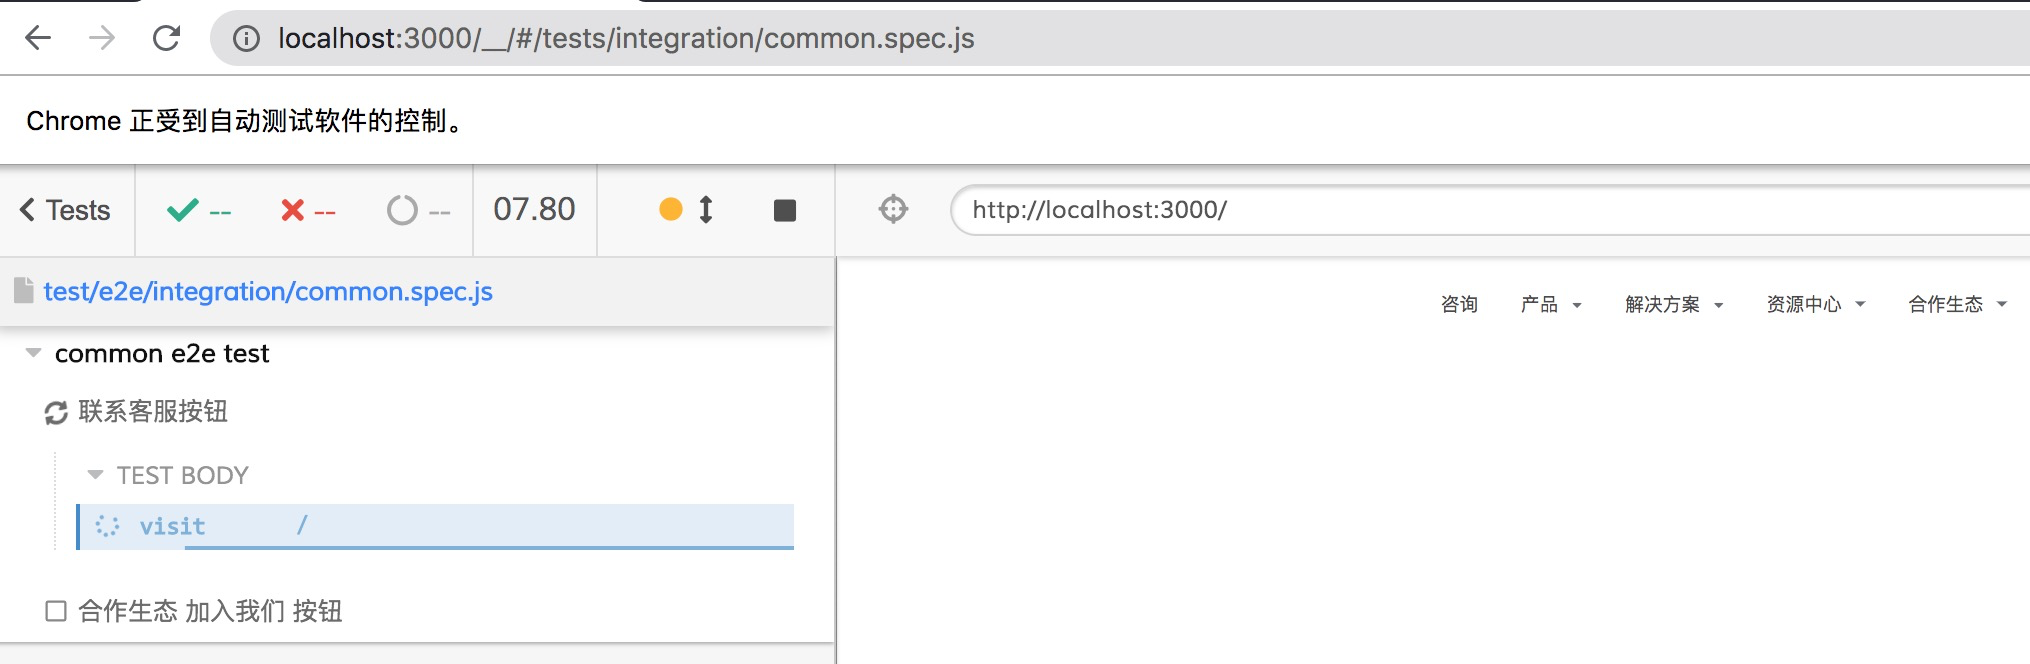
更复杂的示例
  beforeEach(() => {
    // 免登录
    cy.setCookie('_yapi_token', 'GXgIZ7rr7gF1o38EugAWgSgHoyC-e2MbZU43uHapqkk')
    cy.setCookie('_yapi_uid', '2426')
  })

  it('import swagger', () => {
    let resp = {"code":"1","payload":{"total":-1,"rows":[]},"success":true}

    let apps = resp.payload.rows.filter(item => item.language == 'Java8' && ['job', 'scheduler', 'openresty'].every(name => !item.name.includes(name)))

    apps.forEach(item => {
      let url = `https://dev.domain.com/${item.name}/v2/api-docs`;

      let yapi = 'https://yapi.domain.com/group/2120'
      cy.visit(yapi)
      cy.wait(1000)

      // cy.contains(item.name).click()
      cy.contains('添加项目').click()
      cy.get('#name').type(item.name)
      cy.contains('创建项目').click()

      cy.contains('设 置').click()
      cy.contains('Swagger自动同步').click()
      cy.get('.ant-switch-inner').last().click()
      cy.get('.ant-select-selection').last().click()
      cy.contains('智能合并').click() // 选择下拉列表选项
      cy.get('#sync_json_url').type(url)
      cy.contains('保存').click()
      cy.wait(1000)
    })
  })
结合TypeScript
在 e2e 目录添加 tsconfig.json,内容如下:
{
  "compilerOptions": {
    "noEmit": true,
    // be explicit about types included to avoid clashing with Jest types
    // add more types if have custom commands
    "types": ["cypress"]
  },
  "include": ["../../node_modules/cypress", "./*/*.ts"]
}
在 e2e/support 添加 index.d.ts,如果有自定义命令的话
/* eslint-disable no-unused-vars */
/// <reference types="cypress" />

declare namespace Cypress {
  // eslint-disable-next-line @typescript-eslint/no-unused-vars
  interface Chainable<Subject> {
    /**
     * Create login server
     * @example
     * cy.login()
     */
    login(): Chainable<any>
  }
}
将 e2e/integration/xxx.spec.js 重命名为 e2e/integration/xxx.spec.ts,并添加如下2行内容:
+ /// <reference types="cypress"/>
+ /// <reference types="../../support" />

descript('something', function(){
  // some test code here
})
持续集成
持续集成的第一步要选择合适的包含 Cypress 的镜像。
注意自身的 Node 版本选择合适的镜像。
另一方面,一般 CI 环境下执行的是 cypress run 命令。
run 与 open 的不同之处在于,run 默认不会启动浏览器界面,使用的是 headless 模式执行用例。
同时,需要安装 Cypress 时,需要设置环境变量 CYPRESS_INSTALL_BINARY
最后,还是要强调一下,在生产安装依赖环节,使用如下命令安装依赖,则不会安装 Cypress 依赖
yarn --frozen-lockfile --production
直接运行 Cypress
直接运行 Cypress 的场景是,e2e 作为 CI 的最后一个阶段,当应用完成部署后,再对应用运行线上的测试。
cypress:
  image:
    name: cypress/base:12.19.0
    entrypoint: [""] # https://github.com/cypress-io/cypress-docker-images/issues/300
  stage: e2e
  when: manual
  tags:
    - docker
  script:
    - CYPRESS_INSTALL_BINARY=your-domain/cypress.zip yarn --frozen-lockfile
    - $(npm bin)/cypress run --env config=dev
不推荐选择 cypress/included 镜像直接执行 Cypress 命令,因为很可能会遇到以下问题。
当然,如果自己的用例写的不好,也很可能会出现下面的问题。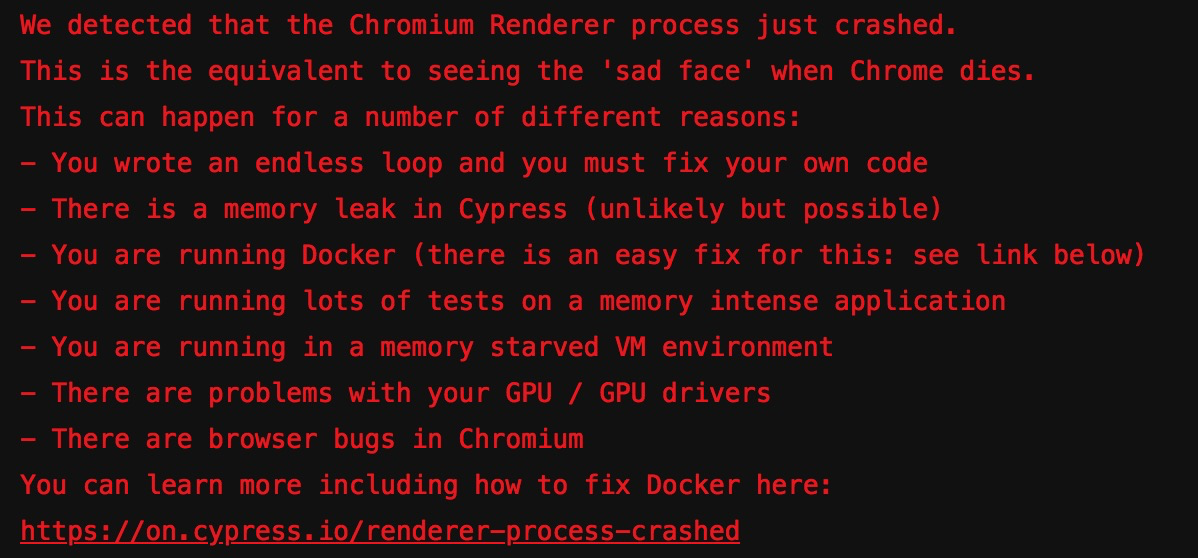
使用 start-server-and-test
如果需要本地起个 localhost 服务,然后再运行 cypress。那么可以合作官方推荐的 start-server-and-test 模块。它在 CI 上的执行顺序是:
- 在系统后台执行拉起本地服务的命令
- 使用 wait-on 模块监听并等待该本地服务响应 200
- 执行 test 命令,完成并退出
- CI 环境此时会自动关闭所有后台进程并退出
下面以 gitlab.com 为例,展示执行完 gitlab jobs 后可看到 test 记录和下载测试产物(视频及截图)
- package.json
{
  "scripts": {
    "e2e": "start-server-and-test \"yarn dev\" http-get://localhost:3000 \"cypress run \""
  },
  "devDependencies": {
    "cypress": "^6.0.1",
    "start-server-and-test": "^1.10.8"
  }
}
- .gitlab-ci.yml
# 参考 https://gitlab.com/cypress-io/cypress-example-docker-gitlab/-/blob/master/.gitlab-ci.yml
# 参考 https://github.com/cypress-io/cypress-example-kitchensink/blob/master/.gitlab-ci.yml

# 这是 gitlab-ci 默认执行顺序。也可以省略
stages:
  - build
  - test

# to cache both npm modules and Cypress binary we use environment variables
# to point at the folders we can list as paths in "cache" job settings
variables:
  YARN_CACHE_FOLDER:  "$CI_PROJECT_DIR/.yarn"
  npm_config_cache: "$CI_PROJECT_DIR/.npm"
  CYPRESS_CACHE_FOLDER: "$CI_PROJECT_DIR/cache/Cypress"

# cache using branch name
# https://gitlab.com/help/ci/caching/index.md
cache:
  key: ${CI_COMMIT_REF_SLUG}
  paths:
    - .npm
    - .yarn
    - cache/Cypress
    - node_modules

# this job installs NPM dependencies and Cypress
install:
  only:
    - merge_requests
  image: cypress/base:12.19.0
  stage: build
  script:
    - yarn --frozen-lockfile
    # check Cypress binary path and cached versions
    # useful to make sure we are not carrying around old versions
    - $(npm bin)/cypress cache path
    - $(npm bin)/cypress cache list
    - $(npm bin)/cypress verify

# all jobs that actually run tests can use the same definition
e2e test:
  only:
    - merge_requests
  image: cypress/base:12.19.0
  stage: test
  script:
    # start the server in the background
    - yarn e2e
  artifacts:
    when: always
    paths:
      - cypress/videos/
      - cypress/screenshots/
    expire_in: 1 week
This job is stuck
 如果是自建的 gitlab, 可能会遇到这个问题。
这是任务没有打对标签,导致无法给任务分配对应的 Runner。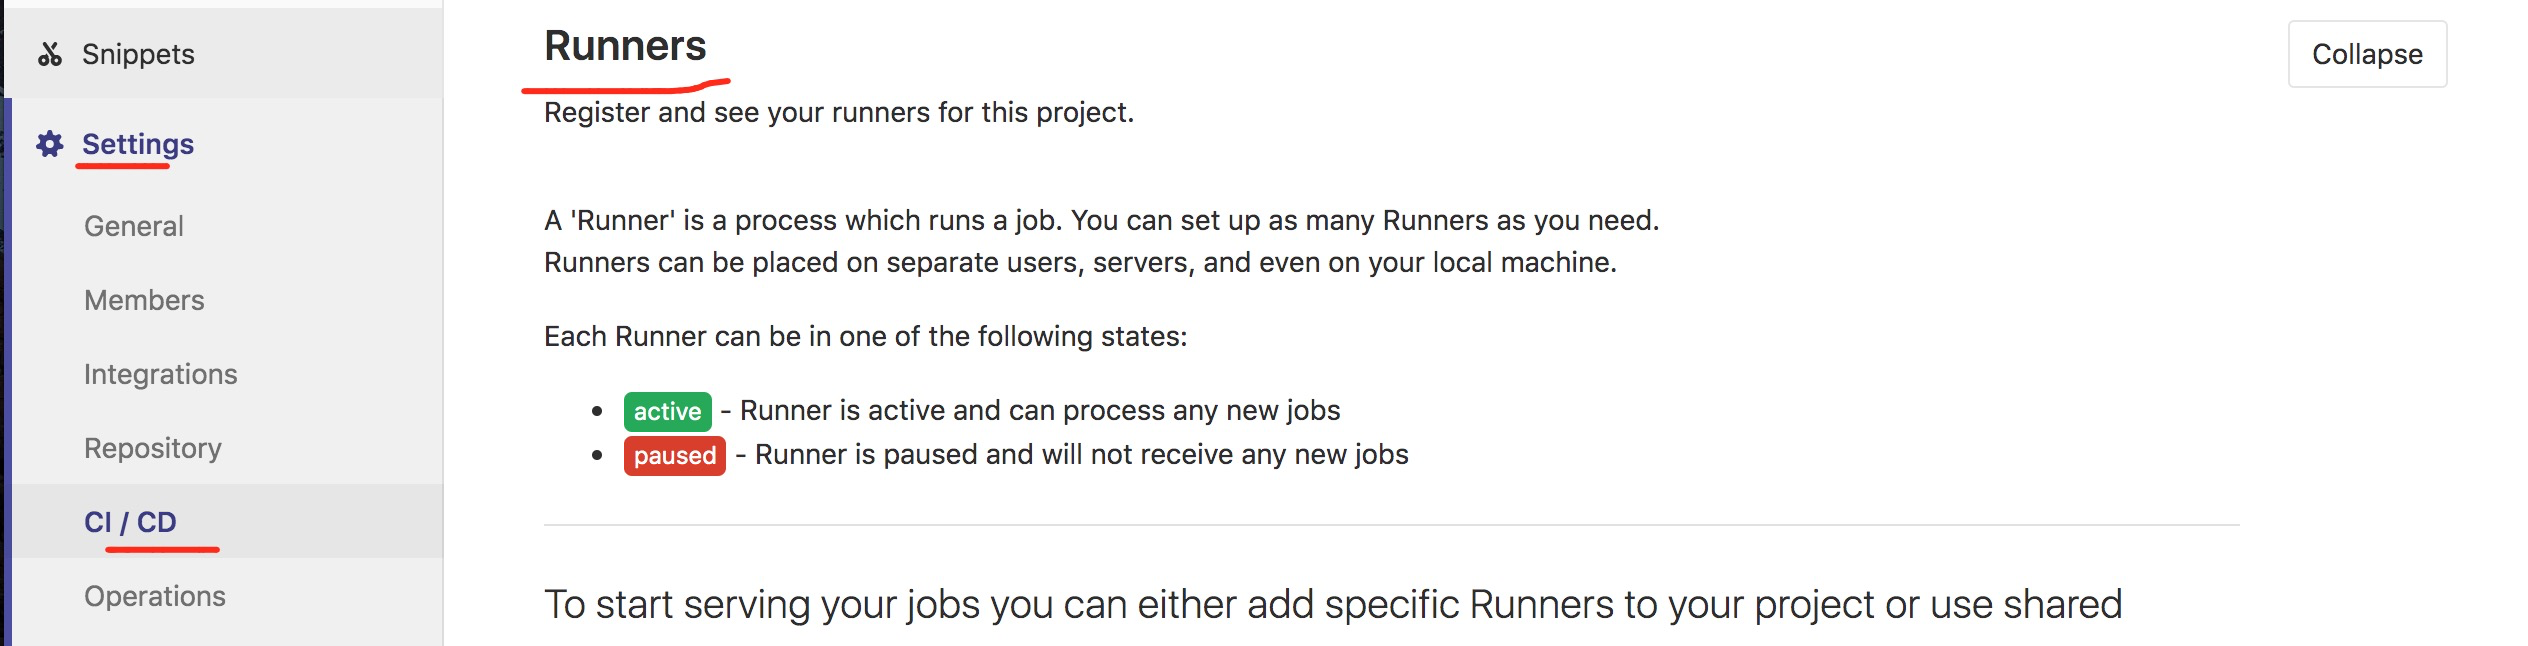
进入上图所示页面,注意找到可使用的 Runner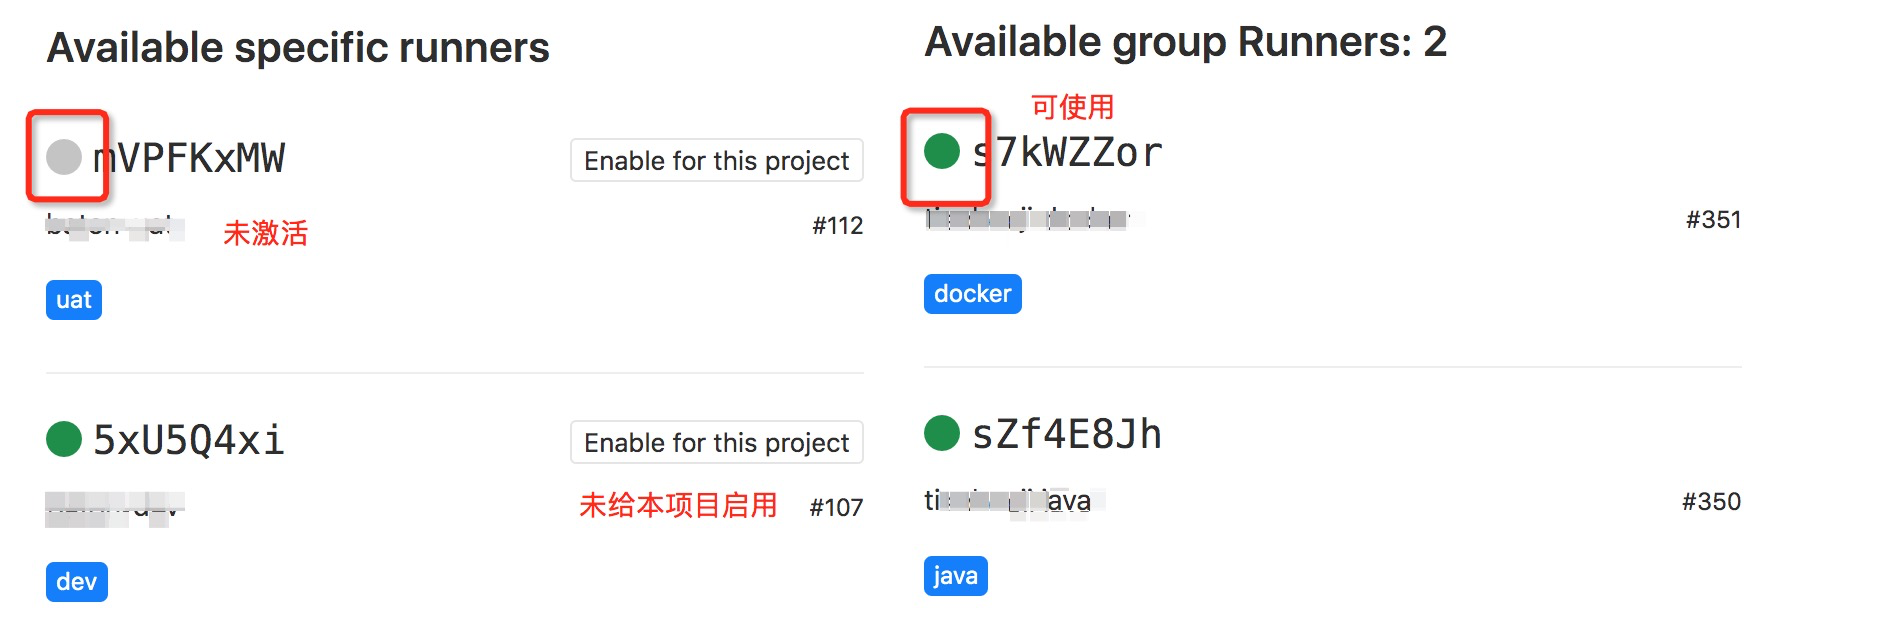
如上图所示, docker 标签对应的 Runner 是处于激活状态的,则在 CI 文件里配置即可
cypress:
  tags:
    - docker
Cypress Dashbord
Cypress 官方提供了一个测试记录托管服务。在 CI 命令中,只需要加上 --record --key $key 即可。
script:
  - cypress run --record --key $key
CI 日志如下: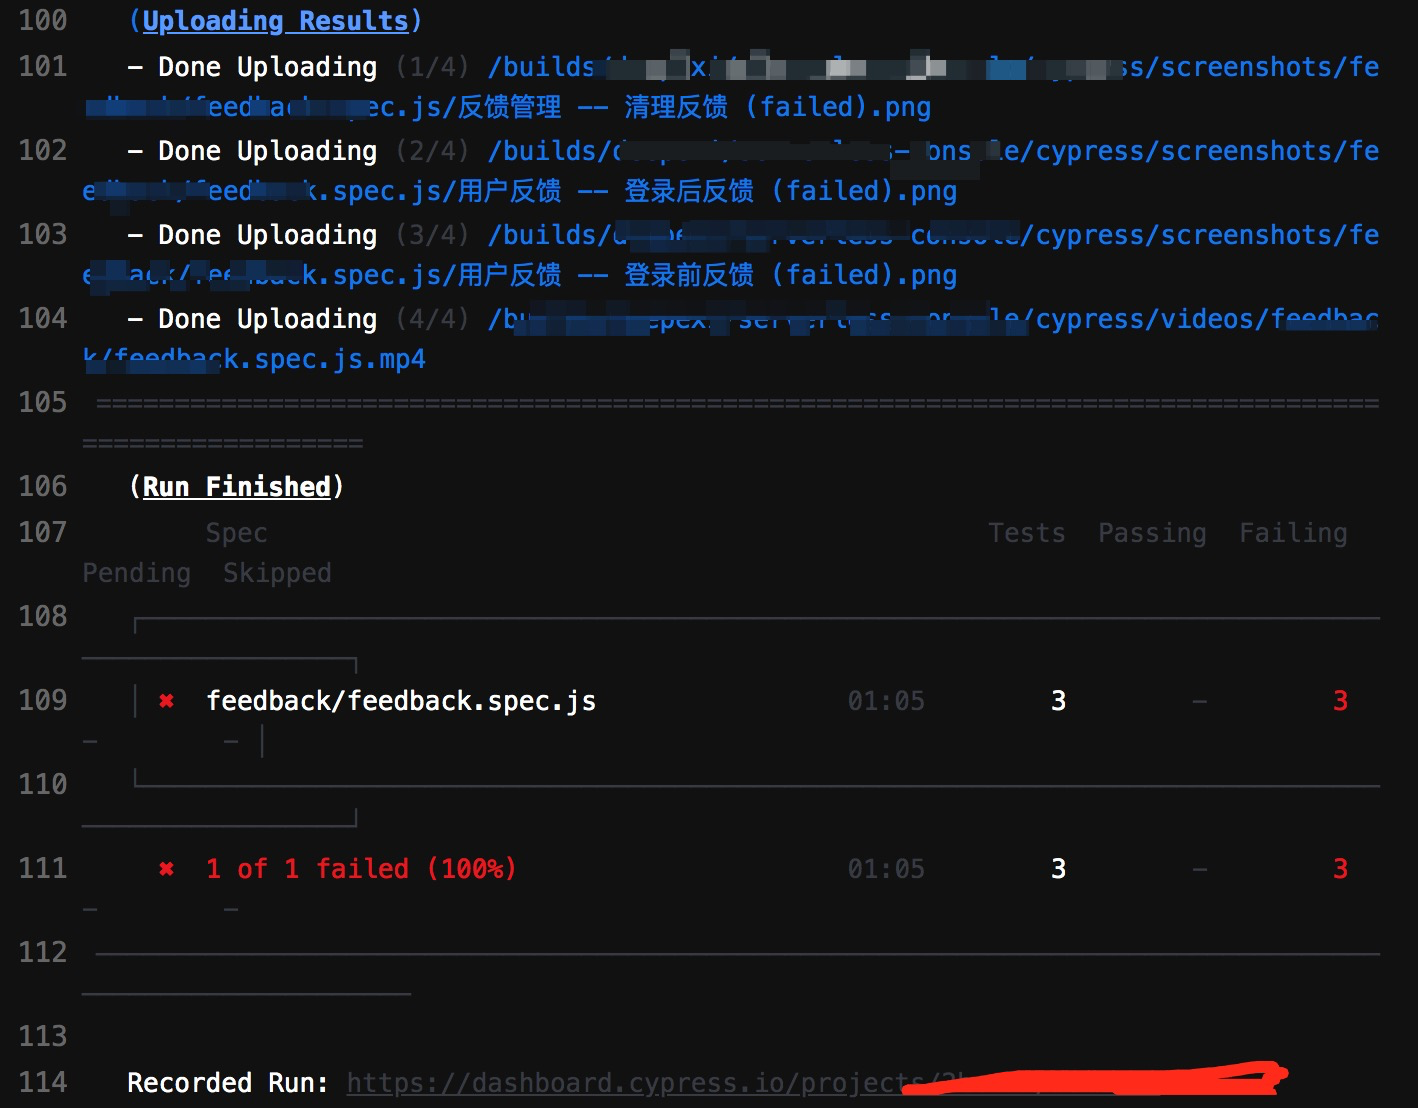
更多介绍请查阅官方文档
总结
cypress 比较适合写一个流程测试。一般情况下,只需要把整个正常流程操作使用 cypress 记录下来即可。
一个流程可能长这样:创建->验证->修改->验证->删除->验证。那我们就可以根据该流程,模拟填写合法数据,模拟点击提交按钮,检查页面是否有相应内容即可。
这样,每次开发新功能后,编写测试用例,再跑 Cypress,就能把一部分的回归测试自动化了,保证完成新功能的同时,原有功能最低限度地保持可用。